To install your SSL Web Server Certificate on BEA Weblogic follow the instructions below:
a. Fetch your SSL Web Server Certificate
1.You will receive an email when your certificate is issued.
2.Go to your Status page: https://www.thawte.com/cgi/server/status.exe
3.Enter your Order number and password
4.Install the Certificate:
- If you have a PEM format private key Copy and Paste your thawte Certificate to Notepad and save as a cert.pem
- If you have a DER format private key, you need to save the SSL certificate and the Root certificate in DER format.
- To convert a certificate in DER format
- Copy & paste the certificate in a notepad file.
- Save the certificate with a .cer extension on a Windows 2000 and later versions.
- Double click on the .cer file, choose Details Tab>Copy To File> to convert the certificate to a DER Format (DER Encoded binary X509).
- The resulting file will have a .cer extension, you can rename it to .der and use it with Weblogic.
b. Install your thawte certificate
When you receive your digital certificate from thawte, you need to store it in the \wlserver6.0\config\mydomain directory.
Note: If you obtain a private key file from a source other than the Certificate Request Generator servlet, verify that the private key file is in PKCS#5/PKCS#8 PEM format.
1.Configure WebLogic Server to use the SSL protocol, you need to enter the following information on the SSL tab in the Server Configuration window:
In the Server Certificate File Name field, enter the full directory location and name of the digital certificate for WebLogic Server.
In the Server Key File Name field, enter the full directory location and name of the private key file for WebLogic Server. Defining Fields for the SSL Protocol.
2.Use the following command-line option to start WebLogic Server. -Dweblogic.management.pkpassword=password where password is the password defined when requesting the digital certificate.
Storing Private Keys and Digital Certificates
Once you have a private key and digital certificate, copy the private key file generated by the Certificate Request Generator servlet and the digital certificate you received from thawte into the \wlserver6.0\config\mydomain directory. Private key files and digital certificates are generated in either PEM or Definite Encoding Rules (DER) format. The filename extension identifies the format of the digital certificate file. A PEM (.pem) format private key file begins and ends with the following lines, respectively:
-----BEGIN ENCRYPTED PRIVATE KEY-----
-----END ENCRYPTED PRIVATE KEY-----
A PEM (.pem) format digital certificate begins and ends with the following lines, respectively:
-----BEGIN CERTIFICATE-----
-----END CERTIFICATE-----
Open the Administration Console.
Open the Server Configuration window.
Select the SSL tab. Define the fields on this tab by entering values and checking the required checkboxes. (For details, see the following table.)
Click the Apply button to save your changes.
Reboot WebLogic Server.
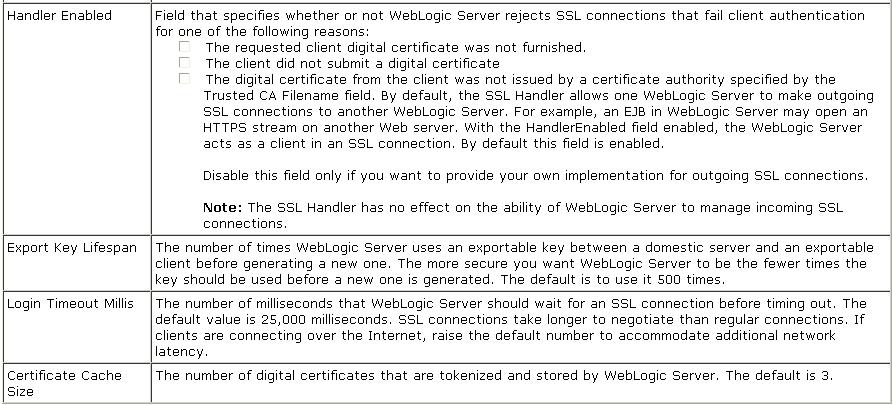
The following table describes each field on the SSL tab of the Server Configuration window. Note: Remember if you are using a PKCS-8 protected private key, you need to specify the password for the private key on the command line when you start WebLogic Server.
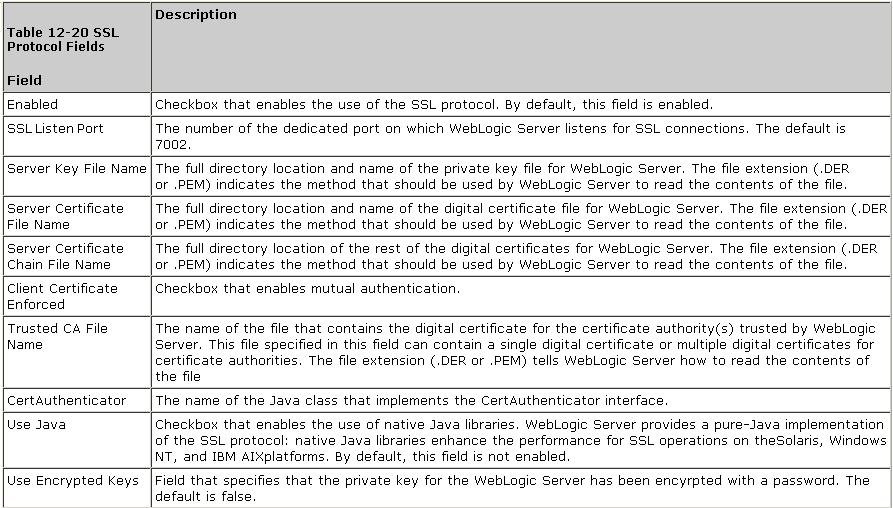
|
